Amy Yang
March 25, 2025
How to Create Your Own Silver Clay Ring: Step-by-Step Updates in 2025
💍 Getting Started: Prep Time!
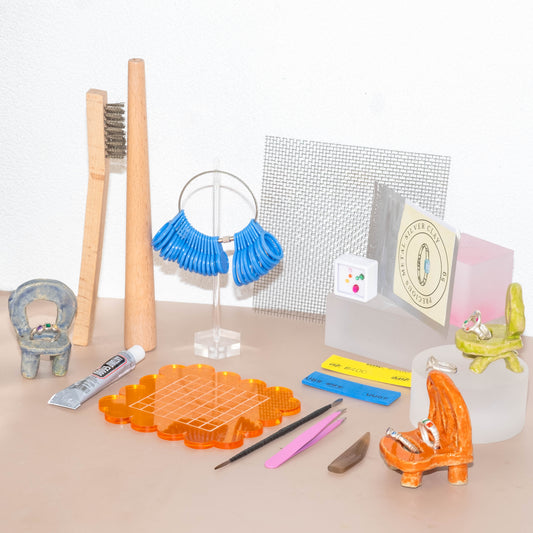
🧰 What’s Inside:
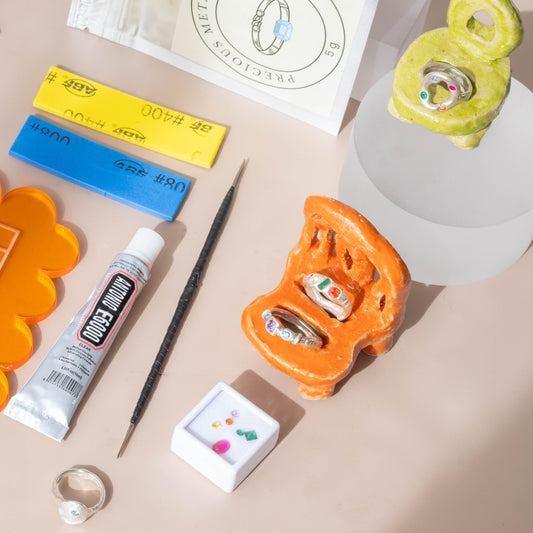
Silver clay 5g (enough for one ring)
Heat-resistant stones
Ring sizers and mandrel
Acrylic pressing tool with measurement markings
Clay sculpting knife
Steel brush
Sintering mesh for firing
2*grit sponge sandpapers
Agate knife for polishing
Jewellery glue
Grid paper
You'll also need:
Clean and smooth work surface
Gas stove for firing
Tape
Small water container
DAZZLING DIY SILVER RING KIT
Step 0: Get to know the material and process 🎬 Watch tutorial
🧰 Important note:
Before you dive into the fun part (a.k.a. playing with silver clay!), here’s a quick checklist to set you up for success. Think of this as your pre-crafting warm-up — trust me, it’ll save you time and help avoid beginner oopsies.
💡 Let's start simple:
✋ Wash and dry your hands (sweaty hands might damage your clay) — clean hands = happy clay! A little hand cream is okay if your hands are super dry.
✏️ Sketch your design idea — it’ll help you move faster and more confidently once that clay comes out.
🌬 Set up in a well-ventilated area — especially for the firing stage!
💡 Quick Tips You Have to Know:
⚠️ Let your piece dry completely before firing
Rushing this can lead to cracks or breakage. Be patient — your piece deserves it!
🎁 Keep unused clay tightly wrapped in plastic wrap
Silver clay dries super fast. Seal it up so it stays soft and workable.
📏 Go up 1–2 sizes when making a ring
Silver clay shrinks 6–10% when fired, so sizing up ensures a comfy fit after the magic happens.
💪 Don’t go too thin — especially around connection points
999 silver is soft after firing, so a chunkier design = a stronger, longer-lasting ring!
Step 1: Measuring and Planning
Measure your finger using the ring sizers
Go up 1-2 sizes (the ring will shrink 6-10% when fired)
Tape the grid paper to your mandrel (only tape the outside edges). Important: Make your ring around the paper, not directly on the wooden mandrel - it'll be much easier to remove!
Mark your measurements on the grid paper


Step 2: Working with the Clay
Carefully open the clay package. If it's sticky, use clean tools or hands to gather it into the center (like working with sticky tack)
Knead the clay a few times until it doesn't stick to your fingers. If your hands are sweaty, use tools instead to mix it (sweaty hand might damage the clay)
Roll the clay into a ball, then into a noodle shape using the acrylic pressing tool
Check if it's long enough using the grid marks (each square is 1cm x 1cm)


Step 3: Shaping Your Ring
Gently press your clay noodle to make it a bit flatter - think pancake, but not too thin!
When you wrap it around, you'll have some overlap - trim this off but keep those bits back to bag (they're perfect for securing the gems!)
Make the joining ends a bit rough (like drawing tiny hashtags) so they stick together better
Add just a tiny drop of water and carefully bring the ends together using the clay knife
Smooth everything out using your fingertip and a tiny bit of water to the joint until you can't see where the join was - like magic! ✨


Step 4: Adding Your Sparkly Stones ✨
First, decide where your stones will sit - There are two types of gems in our kits:
1️⃣ Flat-bottom gems → Place them flat side down.
2️⃣ Classic diamond-shape gems → Place them with the pointed end facing down.
Create cozy little seats for each stone by pressing holes into the clay. Carefully place each stone (keeps everything neat and tidy)
Here's the important part: make sure your stones are snugly secured because silver clay shrinks when fired, it can push the gem out if it’s not set properly:
1️⃣ Make sure the girdle (widest part) of the gem is covered with clay.
2️⃣ Use the noodle method—roll a tiny piece of clay into a thin "noodle" and build a small wall around the gem.
3️⃣ Check from the side view—if you can still see too much of the gem, press it in a bit more in or add more clay around it.
You can also add any fun textures or patterns you'd like


Step 5: Time to Dry! 🌞
Start with a gentle heat gun or hairdryer for 5 minutes - this helps your ring keep its shape
For the final dry, either keep using your heat gun for 15 more minutes, or pop it in the oven at 150°C for 10 minutes (just make sure you've got good ventilation!)
Let your ring dry out completely before moving forward - this is super important! If you try to fire it while it's still damp inside, it could crack or break immediately
Carefully remove the ring out of the mandrel


Step 6: Firing Your Creation 🔥
Begin with careful sanding using 400 to 800 grit sandpaper. Take your time here - your dedication will shine through in the final piece.
It's your final chance to carve any fun textures or shapes you'd like
Now for the transformation - firing your ring. This crucial step turns your creation into lasting silver jewelry. Here's your step-by-step guide:
Begin gently: Set your gas stove to medium heat to protect your piece from sudden temperature changes.
Position with care: Place your piece near the flame's edge, gradually moving it centerward over.
Increase heat gradually: Slowly turn up the flame, watching for the telltale orange glow.
Maintain the heat: Keep your piece at high temperature for at least 25 minutes, ensuring even heating.
Pro Tips:
Give your piece a gentle quarter-turn every 5 minutes for even results
Stay calm if you see initial flames - this is perfectly normal


Step 7: Polishing and Making It Shine ✨
Start with a thorough brushing using your wire brush in circular motions - this removes the oxidation layer and reveals the beautiful pure silver underneath
For that extra professional finish, use your agate knife to scrape the surface:
Start with gentle pressure and gradually increase as needed
Work in one direction for consistent results
Pay special attention to the areas around stones
Keep polishing until you achieve your desired level of shine - from subtle elegance to mirror-like brilliance! ✨


🎉 You Did It!
Take a deep breath, admire your gorgeous creation, and give yourself a high five! 🙌
Making silver jewelry from scratch is no small thing — you're officially a maker of shiny treasures. 💍

I’d LOVE to see what you’ve created — tag me on socials or drop a photo in the comments!
You never know, you might inspire someone else to start their silver clay journey too ✨


